The Standard Widget Toolkit, commonly known as SWT, is one of the few Java GUI libraries that are still actively maintained. Popularized by the use in Eclipse IDEs, it has a remarkable ability to present apps that look and feel native across all major desktops. Let me show you how to set up a Gradle project to build cross-platform, self-contained apps that mimic the native theme. 🤖
If you've worked with JavaFX or Swing before, you might notice that SWT has quite a different API design. This is mostly because it stays extremely close to the native GUI toolkits, making it much lower-level than both Swing and JavaFX. This post is not about SWT itself, although I'd be talking about some structural aspects that made it tricky to integrate with Gradle. You can read their docs if you'd like to learn more about SWT programming. There's another Eclipse project called JFace that provides common utilities for SWT programming.
A bit of background
SWT was created by IBM in 2003 as an alternative to Swing and AWT. It is essentially a thin binding on top of native GUI toolkits, delegating all rendering work to the underlying platform. This makes normal SWT apps look exactly like native apps of the corresponding platforms. However, the way SWT JARs were distributed always made it cumbersome to integrate with Gradle-based projects.
SWT is released as platform-specific JARs, each embedding JNI libraries to interact with the native platform. Initially, these JARs were only available on P2 repositories. So we had to either manually download them into our classpath or use some hacks to pull from them. Fortunately, Eclipse has started publishing the JARs on Maven Central since 2017. Although certain issues still don't let Gradle resolve the SWT dependencies, we'll see how DiffPlug's plugin solves this problem.
The second big problem is that these JARs are described as automatic modules, making it impossible to use with tools like jlink to generate custom runtime images. This is where the ModiTect plugin come in, converting them into modular JARs fully compatible with jlink.
Project setup
The project sources can be found on GitHub. Make sure you have at least JDK 11 and Gradle 6 installed before continuing. We start by generating a barebones Gradle project and setting up the DiffPlug Maven Central plugin. You'll need to fetch the Eclipse bundle version of the SWT release you need.
plugins {
    java
    application
    id("com.diffplug.eclipse.mavencentral") version "3.23.0"
}

repositories {
    mavenCentral()
}

application {
    mainClassName = "in.praj.demo.SwtApp"
}

val swtBundleId = "org.eclipse.swt"

eclipseMavenCentral {
    // Build version of the Eclipse bundle
    release("4.16.0") {
        implementationNative(swtBundleId)
        useNativesForRunningPlatform()
    }
}
Notice that you might need to append a .0 to the bundle version because the plugin only accepts proper semver format. The call to useNativesForRunningPlatform fetches the required SWT release for the current platform, and implementationNative ensures that this JAR will be available on Gradle's implementation configuration. We'll be referencing this JAR later for making it modular. Next, we write a simple "Hello World!" application.
package in.praj.demo;

import org.eclipse.swt.SWT;
import org.eclipse.swt.layout.GridData;
import org.eclipse.swt.layout.GridLayout;
import org.eclipse.swt.widgets.Display;
import org.eclipse.swt.widgets.Label;
import org.eclipse.swt.widgets.Shell;

public class SwtApp {
    public static void main(String[] args) {
        var display = new Display();
        var shell = new Shell(display);
        shell.setLayout(new GridLayout(1, false));
        shell.setText("SWT Demo");
        shell.setSize(300, 200);

        var label = new Label(shell, SWT.NONE);
        label.setText("Hello World!");
        label.setLayoutData(new GridData(
                SWT.CENTER, SWT.CENTER, true, true
        ));

        shell.open();
        while (! shell.isDisposed())
            if (! display.readAndDispatch())
                display.sleep();
        display.dispose();
    }
}
This should create a basic SWT window with a centered "Hello World!" label. Right now you can execute ./gradlew run to verify the code. To prepare a standalone package, we'll have to import and configure ModiTect plugin.
plugins {
    // ...
    id("org.moditect.gradleplugin") version "1.0.0-rc1"
}

// ...

val moduleDir   = buildDir.resolve("modules")
val imageDir    = buildDir.resolve("runtimeImage")

moditect {
    // Create module for current project
    addMainModuleInfo {
        jvmVersion.set("11")
        overwriteExistingFiles.set(true)
        module {
            mainClass = application.mainClassName
            moduleInfo {
                name     = "core"
                requires = swtBundleId
                exports  = "in.praj.demo"
            }
        }
    }

    // Create module for SWT
    addDependenciesModuleInfo {
        outputDirectory.set(moduleDir)
        overwriteExistingFiles.set(true)
        modules {
            val swtDep = configurations["implementation"].dependencies
                    .first { it.name.contains("$swtBundleId.") }
            module {
                artifact(swtDep)
                moduleInfo {
                    name    = swtBundleId
                    exports = "*"
                }
            }
        }
    }

    // Configure custom runtime image
    createRuntimeImage {
        modulePath.set(listOf(moduleDir))
        modules.set(listOf("core"))
        outputDirectory.set(imageDir)
        ignoreSigningInformation.set(true)

        launcher {
            name   = "demo"
            module = "core"
        }
        stripDebug.set(true)
        noManPages.set(true)
        noHeaderFiles.set(true)
        compression.set(2)
    }
}
ModiTect should generate a module-info.java for each of the JARs we want to modularize. These can later be used to prepare a custom Java runtime, with the createRuntimeImage task. Finally, we define a imageZip task that packs the jlink-generated runtime into a self-contained zip.
tasks.register<Zip>("imageZip") {
    dependsOn("createRuntimeImage")
    from(fileTree(imageDir))
    destinationDirectory.set(buildDir)
    archiveFileName.set("demo.zip")
}
Results
Simply execute ./gradlew imageZip to get a self-contained demo.zip inside our build directory. Now, anyone having the same platform as the current one should be able to extract the zip and run the app. You'll need to build the project again on different platforms if you want to target them. Here are some screenshots from Windows 10, Arch Linux and OpenSUSE desktops (left to right): 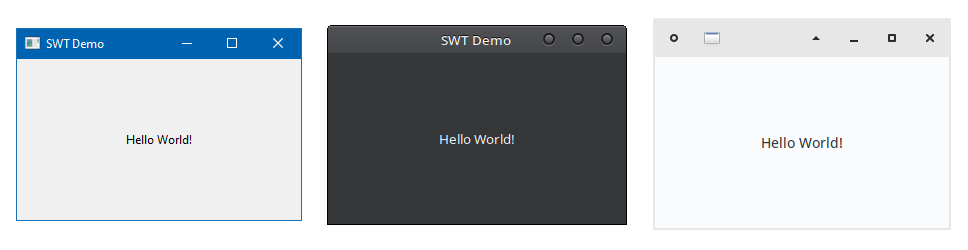
SWT is a great choice when it comes to building cross-platform, native-looking apps. And with plugins from DiffPlug and ModiTect, building self-contained SWT apps has become easier than ever. 🔧